How to Choose a Jerky Gun
Match the gun to your batches. Around 2 pounds suits home use, 2.5 pounds and up suits game and bulk; choose stainless for durability or plastic for value, with both nozzles and a smooth trigger. Above all, heat the meat to a safe internal temperature before or after drying, per USDA guidance.
A jerky gun presses seasoned ground meat into flat strips or round sticks that you then dry into jerky. It is judged on capacity, build material, the nozzles it comes with, and how easy it is to load and clean. Match those to how much jerky you make and the choice gets easy. This guide breaks down each factor so you can buy with confidence.
Which jerky gun do you need?
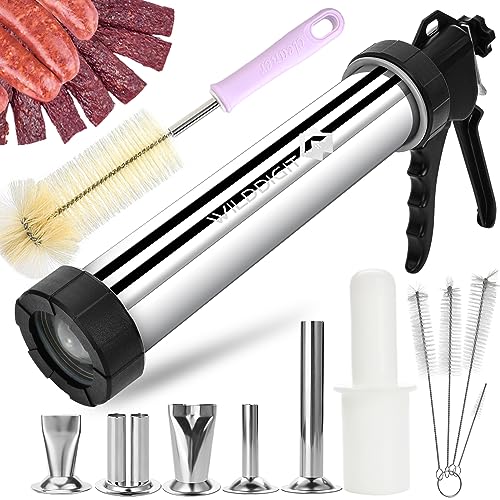
Stainless Steel
Best for durability
- Sturdy, food-safe stainless barrel
- Handles firm pressing
- Easy to keep clean
- Costs more than plastic

Large-Capacity
Best for big batches
- 2.5 lb and up per load
- Fewer refills for bulk
- Good for game processing
- Heavier when full

Value Kits
Best for starting out
- Gun plus flat and round nozzles
- Often includes a cleaning brush
- Affordable entry
- Some parts may be plastic
Find the right jerky gun for your needs
| Your need | Best type | What to look for | Start here |
|---|---|---|---|
| Starting out | Value kit | Flat and round nozzles, easy loading | Best for Beginners |
| Durability & cleaning | Stainless steel | Stainless barrel, sturdy trigger | Best Jerky Guns |
| Big or game batches | Large-capacity | 2.5 lb+ barrel, strong mechanism | Capacity Compared |
| Strips and sticks | Multi-nozzle | Flat strip and round stick tips | Best Jerky Guns |
| Ground or whole-muscle? | Either | A gun is for ground meat | How It Works |
Key features that actually matter
A larger barrel means fewer refills; 2 lb suits most, 2.5 lb+ suits big or game batches.
Stainless steel is durable and easy to keep food-safe; plastic is lighter and cheaper.
Flat tips make classic strips, round tips make snack sticks; a kit with both is versatile.
A smooth, sturdy trigger presses firm meat without straining; "3rd gen" designs improve this.
Parts that come apart and, ideally, are dishwasher-safe make cleanup after raw meat easier.
A wide barrel and follower make packing seasoned ground meat quick and tidy.
Heat the meat to a safe temperature before or after drying, per USDA jerky guidance.
A brush for the barrel and nozzles helps clear meat from tight corners.
A note on food safety
Jerky starts as raw meat, so temperature matters. Dehydrating alone may not reach a temperature that kills pathogens, so the USDA recommends heating the meat to a safe internal temperature, generally 160°F for beef and 165°F for poultry, either before drying (pre-heating strips) or after (post-heating finished jerky in an oven). Follow tested USDA jerky recipes and guidance, use a thermometer, and keep raw meat and equipment clean. The gun shapes the jerky; safe temperature makes it safe to eat.
Common mistakes to avoid
- Skipping the safety heat step. Heat meat to a safe temperature before or after drying, per USDA guidance.
- Using a gun for whole-muscle jerky. A jerky gun is for ground meat; sliced whole-muscle jerky is cut, not extruded.
- Overfilling or forcing. Pack the barrel evenly and press steadily rather than forcing the trigger.
- Leaving it dirty. Clean raw-meat residue promptly from the barrel and nozzles.
- Meat too warm. Keep ground meat cold for cleaner extrusion and food safety.
Final checklist
- How much jerky do I make at once?
- Do I want a durable stainless barrel or a cheaper plastic one?
- Does it include flat and round nozzles?
- Is the trigger sturdy and smooth?
- Do the parts come apart to clean?
- Do I have a plan to heat the meat to a safe temperature?
- National Center for Home Food Preservation (NCHFP) — tested home-preservation methods and the USDA Complete Guide to Home Canning
- USDA Food Safety and Inspection Service (FSIS)
- U.S. Food & Drug Administration (FDA) — Food
- FoodSafety.gov
Explore jerky making equipment
Best Jerky Guns
View best picks → ▤Jerky Gun Database
View database → ◉Best for Beginners
View guide → ⇄Standard vs Large-Capacity
Compare now →Frequently asked questions
What size jerky gun should I buy?
Around 2 pounds suits most home jerky makers, pressing a good batch while staying easy to handle and store. Step up to 2.5 pounds or more if you process game or make large batches and want fewer refills, remembering a full large barrel is heavier to squeeze and hold.
Stainless steel or plastic?
Stainless steel is more durable, handles firm pressing without flexing, and is easier to keep food-safe, which suits regular use. Plastic is lighter and cheaper, which suits occasional batches or a first gun. For frequent jerky making, stainless is worth the extra cost.
What nozzles do I need?
Flat nozzles make classic jerky strips and round nozzles make snack sticks, so a kit with both covers the two styles. Most jerky gun kits include them along with a cleaning brush, which is worth having for clearing meat from tight corners.
Is a jerky gun for ground or whole-muscle jerky?
A jerky gun is for ground meat, which it extrudes into strips or sticks, giving a uniform, tender bite and letting you use leaner or cheaper meat. Whole-muscle jerky is sliced from solid cuts, which needs a knife or slicer rather than a gun.
How do I make jerky safely?
Because jerky is raw meat, heat it to a safe internal temperature, generally 160F for beef and 165F for poultry, before or after drying, since dehydrating alone may not reach it. Follow tested USDA jerky guidance, use a thermometer, keep the meat cold before drying, and clean equipment promptly.
How do I clean a jerky gun?
Disassemble it and wash the barrel, plunger and nozzles promptly after handling raw meat, using the included brush for tight corners, then dry it well. Check whether the parts are dishwasher-safe; many are hand-wash to protect seals and finishes.
What makes pressing easier?
A smooth, sturdy trigger, often marketed as a third-generation design, presses firm meat with less effort, and keeping the ground meat cold and well mixed helps it extrude cleanly. Do not overfill the barrel, since an overpacked gun is harder to squeeze.